Wednesday, October 6, 2010

Balcony Garden Update

Have got my Garden all prepped and ready for summer!
Started harvesting my first Asparagus, with one measuring a whopping 27"
organic fertilizer added, Mulch added.
Fist year for Raspberry bush x 2, Black currant, Gooseberry, Rhubarb, and my blueberries dont look like they have made threw the winter.
second year for Blackberry bushes x 2, and Asparagus x 2, Rosemary, Parsley
planted 3 Tomato bushes, 2 capsicum/ bell peppers, chili peppers, Basil, Coriander, spring Onions, Marigolds, cucumbers, and potatoes


Tuesday, September 21, 2010

Aquaponics How to Video

I have just made 2 new videos on Aquaponics.
the first one shows my working system and the 2nd one shows how to make and set up the aquaponics system along with information on the Bell Siphon


Tuesday, September 14, 2010

Aquaponics System Update

Finally got my aquaponics system up and running.
it was quiet a lot harder than i was expecting to get it right, but at the end I should have keep to the golden rule KISS " keep it simple stupid"
TIPS!
Dont use cheap plastic storage containers, they shatter very easy at the bottom
Dont make the grow beds to shallow,  22cm high is ideal for small system, I used 2x 35LTR
Get a good strong Tank for the bottom and get it colored to keep out light, I used a large patio flower container 105LTR
use 1/2 inch (13mm) and 3/4 inch (19mm) garden irrigation hose and fittings is more practical and cheaper than plumbing fittings on such a small system
use 2LTR soda bottle as filter grates around bell siphon
I made my bell siphon with  60mm pipe, and silicone a piece of 1" on top to make handling easier
make sure you allow about 2" gap above overflow pipe and inside top of siphon.

anyway heres a few pictures, I will publish my video soon.
I am now going to regulate the PH of water ect before adding some fish
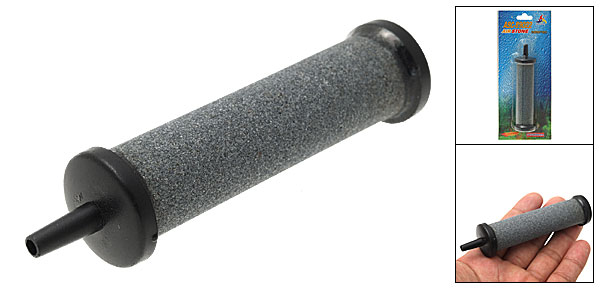
Small pump and filter, I use this to filter the tank and pump to my green wall hanging garden, available from  $17.85 from Hong Kong on ebay! (Click Link)

Air stone, I am using 2 of these,available from ebay each $6.50 Free shipping from Hong Kong (Click Link)


Air Pump with back up batteries for power outage, available from ebay $29 including postage from Hong Kong (Click link)

Expanded Clay pebbles, (You can use gravel ) but I prefer these clay pebbles they are so much easier to work with, purchased in Australia from ebay 50 LTRs $22 (Click Link)

This is all the plumbing I needed!
13mm irrigation pipe, 2 x 13mm Flow control taps, 1 x 13mm T joiner, 2x 13mm End caps, 13mm tube, small pond pump (350Ltrs per hour)
2x 19mm tank fitting, 2x 19mm tank fitting extenders, 2x pieces of 20mm tube, 2x 19mm Corner connectors, 2x  60mm plastic pipe, 2 x 60mm end covers, 2x 2LTR soda bottle, 2x 35LTR plastic containers (Grow beds) and ix 105Ltr garden grow box ( Fish Tank)
My fittings I got online from Ebay in australia but are readily available in Bunnings, Home Depot ect

Bell siphon = 60mm wide x 165mm long, cut out groves either side to allow water into siphon and a hole just above to break cycle, allow about 2" from top of overflow pipe to top of inside of bell, the overflow height should be about 2" lower than the layer of clay pebbles.

my tank set up and including my green wall garden

some plants in place with netting at end for cucumbers


looking down from above

their is no need to sprinkle the water like this you can just have a pipe feeding in, just a personal choice

my green wall filled with clay pebbles and strawberry plants gives me additional grow beds by using vertical space.
My set up with fish tank underneath


I purchased the Aquaponics made easy DVD from Murray Hallam, $33 plus shipping this is very good look into aquaponics and recommended set ups

Wednesday, September 1, 2010

Hanging Bottle Wall Garden Part 2

Part 2 of my Hanging Bottle Wall Garden,
video of the whole system working and full with 27 strawberry plants.

Hanging Bottle Wall Garden

My new Design
Hanging Bottle Wall Garden


Monday, August 30, 2010

New Bottle Garden design

I am working on the old green wall / living wall concept I had and used the new hanging garden idea to come up with a free standing Hanging Bottle Garden Farm wall panel that can be moved anywhere.
I intend to make it part of my Aquaponic set up .
video update will follow soon.

Solar can heater update

Slowly working away on my solar can heater, just got to add a solar powered electric fan and exhaust pipe .
will put together a video once its complete and working.
all the cans mounted and ready to paint

A nice black Matt paint finish

Solar cells

I have just got my first batch of solar cells.
I was very surprised how thin and light they are as they are printed on a thin metal sheet and not silicon
I intend to cover all the inside of my conservatory windows that are facing sun exposure.
but project will have to wait as I have 3 others in progress
heres a link to the ebay store in florida, free worldwide shipping and great service.
Click here for Solar cell ebay store!

Wednesday, August 25, 2010

Hanging Bottle Garden Farm Update

Just a look at the progress of my hanging bottle garden farm and a new idea of 2 holes in the bottle , 1 in front and 1 in back.

Thursday, August 12, 2010

Aquaponics Update


I did some work on setting up my aquaponics set up! after watching the DVD i learnt the basics, I did break one rule of having a too small set up, but my experiment is for small spaces so will go forward and see what happens.

My 2 grow beds above the fish tank.
i used two plastic under bed storage containers from a KMart, they were $16 each and are 35Lt's, the fish tank is a 120 Lt's plastic storage bin cost about $22

I built a wood frame around the fish tank to support the grow beds, including a chook (Chicken) coop.
the wood was from an Ikea futon bed that was recycled.


I driled a 1" hole in bottom of grow bed to add a bell syphon, to flood and drain system, I wanted to see if I could create my own version using plastic bottles, I will update latter once the silicon seal is set.


Pumps are very expensive and i wanted to keep the cost low so I went for a cheap filter /pump combo that sprinkles water on surface and filters, this was $17.85 from Hong Kong on ebay!
I also picked up a small aquarium pump at the garden center for $15

Wednesday, August 11, 2010

Worm Farm


I went to a compost and worm farm community talk and class, anyway it was very informative and got to watch the worm farm put together.
at the end there was a raffle for 2 worm farms.
I am now the proud owner of 1 of them.
it was my intention to make one out of recycled stuff , but hey whose complaining.


The new Worm farm tower
Far right! The base with legs, and tap, 1st tray, 2nd tray, and lid
2 composting bins, will only use one , as it fills up with worm castings will start using 2nd one, the worms make their own way up.

the first bin is filled with a peat coconut coir soaked in water till its expanded, not wet just damp, place cardboard at bottom of 1 tray to stop the dirt falling threw, spread the mix and add the worms , cover with damp news paper. the brown bag was just  temporary added at the class!

The first tray is placed in the bottom of the tower where the worm tea will collect and the tap for harvesting.

add the 2nd tray but will remain unused for time being.


Place the lid on
You dont feed the worms for the first week, just cover with damp paper, then slowly add the scraps of food under the paper, there is no smell, but if you add more than the worms can eat at one time this will rot and start to smell, or if it gets to wet! so dont over feed or make too wet!
also add some bits of card paper with the food to keep a good consistency.
DONT: feed meat, fish or dairy products, (egg shells are ok) or onion or garlic.

It will take about 3/4 months before 1st bin is full and can spread the castings in the garden or in my case on my planter boxes, the worm tea can also be diluted and used as a plant growing tonic.
It will also provide additional food to feed the fish and chooks they will love the worms!!

As my worm farm only came with a sample worm set up, i went to a local garden center and purchased 500 red worms.
FACT: did you know out of 100s of types of worms there are only 3 types that will compost food, the red worm being best?


Tuesday, August 3, 2010

Hanging Bottle Garden Farm

Hanging Bottle Garden farm video now finished. Step by step guide for making a Hanging bottle garden farm.

Sunday, July 25, 2010

Plastiki Arrives in Sydney

Just went down to watch The Plastiki arrive in Sydney at Darling Harbour. boat made of 12,000 plastic bottles that sailed from San Francisco to Sydney, well done David Rothschild and crew


Monday, July 19, 2010

Credit Card Multi tool

I see this on ebay Credit Card Multi tool 11 in 1 and priced at under $2 with free postage I couldn't resist getting one.
Amazingly it came from China well packaged in about 1 week and is actually really kind cool!
It will make a handy addition to my BOB (bug out bag)
although it says 11 in 1 that is kind of stretching it! and the instruction card is in Chinese so hard to make out what all of them are for, but as follows
1. Can Opener
2. Knife / plane
3. Screw Driver
4. Ruler
5. Bottle Opener
6. hexagon wrench 4 sizes
7. No Idea?
8. Saw
9. No Idea ( some kind of direction indicator)
10. small hexagon wrench 2 sizes
11. key Chain Hole ? how that makes a tool not sure!

but as you can see its very small compact stainless steel tool with leather pouch and all for $2
worth it just to have in car at home or in bag
take a look at it on ebay click here! Credit Card Multi tool 11 in 1

Thursday, July 15, 2010

Solar Can Heater

This project I was originally going to start a while back, so I finally got it under way. I have seen these made with huge boxes placed outside homes, but i want mine in an apartment so I decided to mount it on one of the window panels in my conservatory.
by building it inside i dont have to supply the glass and can custom size it to the area i have.

Collect a whole bunch of soda cans and give them a good rinse out!
I have seen most people like to drill these cans with a big opening on top and small holes on bottom! why complicate it when a simple Tin opener can do the trick?
Tilt at angle and slice off top.
This actually gives a very smooth Finnish
Pull off ring tab from top
why drill holes? just use some tin snips or a very strong pair of scissors
cut from pull tab hole in a circular fan shape
finished cut will be fan shape across, this helps slow heat and cause a rotation as it transfers threw soda can
Use a clear silicon to seal the soda cans around neck collar
use something to keep cans aligned in a straight line while they set
I have got a window section that can fit 10 x rows of 6 cans.

This is as far as I got will post more as i continue